QbertCostumePlans
Q*Bert costume construction pictures
Q*Bert costume Halloween 2006 pictures
You can find out more about my Q*Bert costume at Q*Bert costume.
Here are the plans that I sketched out before making the costume.

This image is shows the costume relative to me along with the information about the nose and eyes. Notice the shape on the left that sort of looks like an eye and is next to the text "6 x for body". That's the orange slice shape. Stitch 6 of those together and you get a sphere. I stitched 3 together to make a hemisphere for the top. I did the same for the bottom. I then stitched a long strip of material between them to make the middle part of the body. The result is an oval.
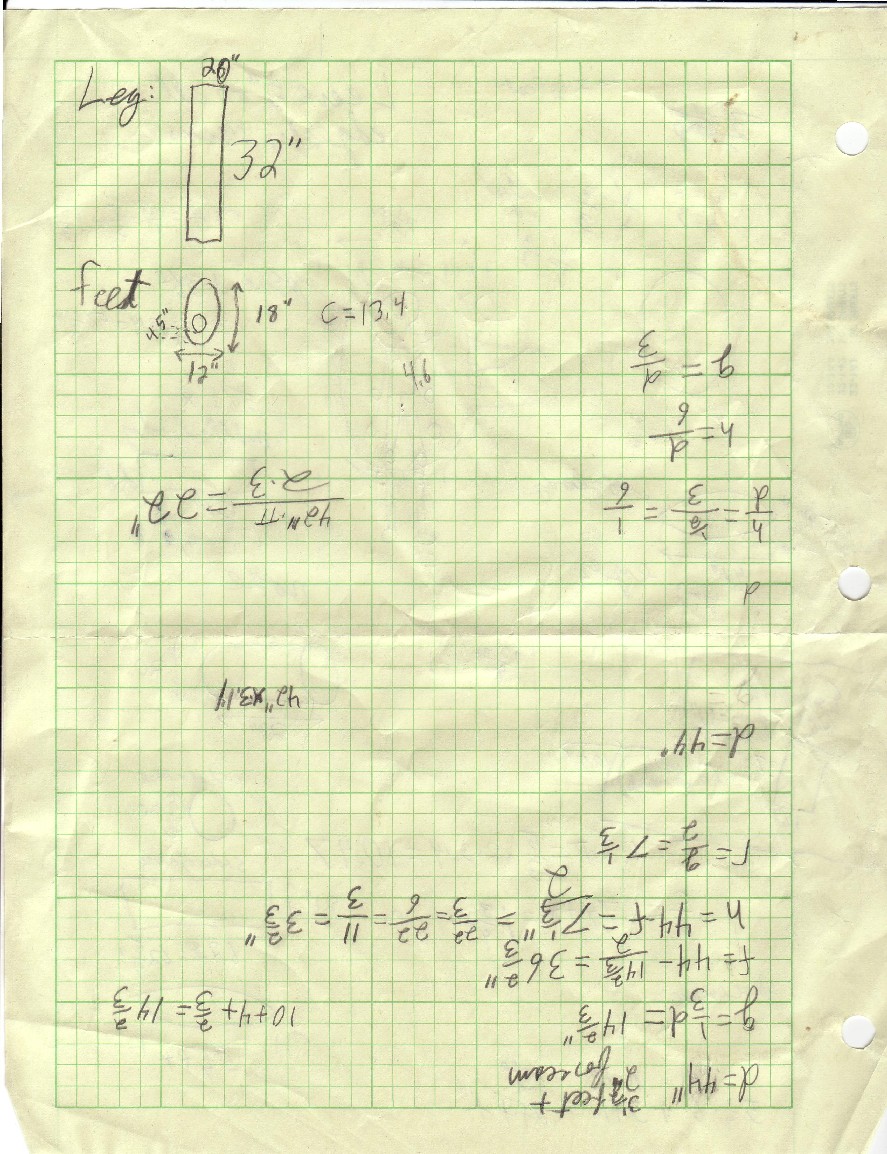
Here are the plans for the legs and feet. The feet were easy once I realized what I wanted. I just cut out two ovals. Then I cut a circle in one oval for the leg. I then sewed the two ovals together and inverted the result. Voila! Feet!

This is more specific information about how to draw the orange slices I referred to above.
d = diameter_of_the_sphere * pi / 2
h = (d - f) / 2 = the distance from the edge of axis
f = distance between the foci that are used to draw the curves of the orange slice.
g = distance down from the axis of the orange slice.
r = height of the curve away from the axis (this is not half of the diameter because I'm not drawing a circle)
To draw the curves to make the slice, first determine the diameter of the sphere that you want and then determine d, f, g, and r.
Draw a line that is of length d on the fabric. Then draw a point that is h in and g down from one end of the line. Do the same at the other end of the line. Those two points are the foci.
Then, attach a string from one foci to one end of the line and then to the other foci. Use a marker to draw the curve from one end of the line to the other, just like you would when drawing an oval.
Only draw the curve on one side of the line. Now, draw foci on the other side of the line and repeat the process or just fold the fabric along the line and cut out along the curve.
You should have a slice that looks like an eye (a squished oval with pointy ends). Now, cut out 5 more of them.
Sew two slices together along one edge. Then, sew one of the free edges to another slice until all slices are attached together. For more specific information on how to do this, see the page I used at:
http://www.jugglingdb.com/compendium/skills/equipment/making/balls/barnesybags.html
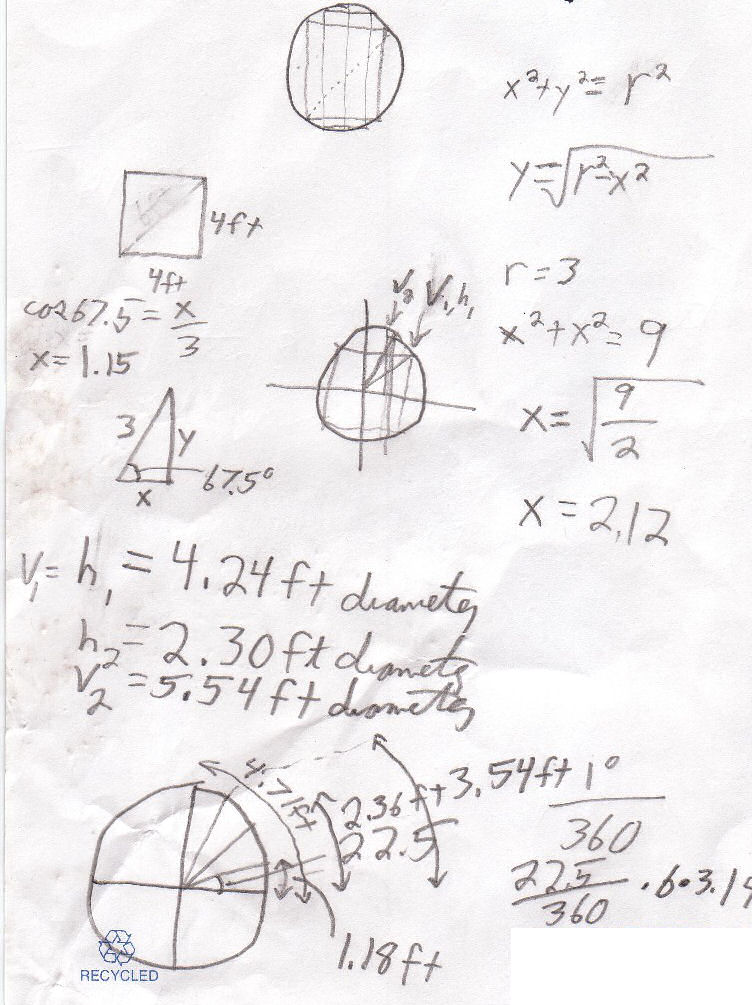
This is how I determined how large the circle should be for the wires that provide additional interior support for the frame.
You can continue your Q*Bert adventure at the Q*Bert construction pictures page. QbertCostumePlans
Q*Bert costume construction pictures
Q*Bert costume Halloween 2006 pictures
Q*Bert costume construction pictures
Q*Bert costume Halloween 2006 pictures
You can find out more about my Q*Bert costume at Q*Bert costume.
Here are the plans that I sketched out before making the costume.
This image is shows the costume relative to me along with the information about the nose and eyes. Notice the shape on the left that sort of looks like an eye and is next to the text "6 x for body". That's the orange slice shape. Stitch 6 of those together and you get a sphere. I stitched 3 together to make a hemisphere for the top. I did the same for the bottom. I then stitched a long strip of material between them to make the middle part of the body. The result is an oval.
Here are the plans for the legs and feet. The feet were easy once I realized what I wanted. I just cut out two ovals. Then I cut a circle in one oval for the leg. I then sewed the two ovals together and inverted the result. Voila! Feet!
This is more specific information about how to draw the orange slices I referred to above.
d = diameter_of_the_sphere * pi / 2
h = (d - f) / 2 = the distance from the edge of axis
f = distance between the foci that are used to draw the curves of the orange slice.
g = distance down from the axis of the orange slice.
r = height of the curve away from the axis (this is not half of the diameter because I'm not drawing a circle)
To draw the curves to make the slice, first determine the diameter of the sphere that you want and then determine d, f, g, and r.
Draw a line that is of length d on the fabric. Then draw a point that is h in and g down from one end of the line. Do the same at the other end of the line. Those two points are the foci.
Then, attach a string from one foci to one end of the line and then to the other foci. Use a marker to draw the curve from one end of the line to the other, just like you would when drawing an oval.
Only draw the curve on one side of the line. Now, draw foci on the other side of the line and repeat the process or just fold the fabric along the line and cut out along the curve.
You should have a slice that looks like an eye (a squished oval with pointy ends). Now, cut out 5 more of them.
Sew two slices together along one edge. Then, sew one of the free edges to another slice until all slices are attached together. For more specific information on how to do this, see the page I used at:
http://www.jugglingdb.com/compendium/skills/equipment/making/balls/barnesybags.html
This is how I determined how large the circle should be for the wires that provide additional interior support for the frame.
You can continue your Q*Bert adventure at the Q*Bert construction pictures page. QbertCostumePlans
Q*Bert costume construction pictures
Q*Bert costume Halloween 2006 pictures
Version 7.1 last modified by Geoff Fortytwo on 25/10/2015 at 20:31
Document data
Attachments:
No attachments for this document